Struggling with Low End in Your Mix? Try This...
You have heard me say this before, but as engineers, we tend to overcomplicate things. Occam's Razor suggests that the simplest solution is always the most effective. Regardless, when faced with mixing problems, we tend to try the most complicated solutions first. When I taught a mixing class at Drexel University, I would tell my students that they were turning their songs into science projects by using overly complicated solutions for simple problems.
For example, if their low end was not hitting right, they would use side-chain compression, dynamic EQ, multi-band compression, parallel compression, clipping, limiting or some complex combination of them all to control the low end. But those approaches should be your last step, not your first. When trying to shape the tone, weight, size and speed of the low end, this simple EQ technique is an effective first step.
3 Steps to Balancing Low End
1) Set the weight or size of the low end with a low frequency shelf
2) Rebalance the first three octaves of the low end with a bell or shelf
3) Set the speed and depth of the low end with a high-pass filter
1) Setting the Size of the Low End
For most popular music, the frequency with the loudest amplitude in a mix is usually between 80 Hz and 100 Hz.
The below graph shows the average spectral balance of #1 hits in the US & UK from 1950 to 2010. (AES, 2013)*
By using the low frequency shelf first, we are setting the size of the low end in relation to the rest of the mix. When setting the shelf, ask yourself, "Is the low end moving the speakers too much?" That may seem exciting in the studio, but it's unlikely to translate to consumer systems that are not designed for excessive low end. "Does the mix lack weight and size? Does the low end feel weak?"
It's best to start with a simple low frequency shelf because it does not change the relationship of the low-end instruments or octaves, only the overall size of the low end in relation to the rest of the mix.
I call this "Right Sizing" the low end. We are looking for that 1dB window to right-size the low end in relation to the whole mix.
I'll use a low-frequency shelf between 80 Hz and 150 Hz to set the right size of the low end of the mix. It can be helpful to close your eyes while you move the gain. That way, your eyes do not make the decision for you, your ears do.
2) Rebalancing the First Three Octaves
It's easier to think of music in octaves than in frequencies. We hear a total of 9.5 octaves, but only the first three consist of the lows and some low midrange. To balance the low end, you want to ensure that the energy is distributed properly among the first three octaves.
Octave 1 - 20Hz-40Hz - Deep subs. This area is perceived less as musical notes and more like a deep pillowy energy or rumble.
Octave 2 - 40Hz-80Hz - Fundamental bass. This is where the fundamental of the bass line and kick sits. The low E on an electric bass is 41Hz. If it's a 5-string bass, the low B is 31Hz. Same goes for an 808 sample that is a low E or B note.
Octave 3 - 80Hz-160Hz - This is the top of the lows and the start of the low midrange. This range will help define the musical note on smaller speakers and is commonly where the low-end attack of the kick or bass is perceived.
With the shelf, we set the overall weight of the low end; now, we are setting the distribution of energy between the first three octaves. I may pull up or down at 40 Hz or 120 Hz to redistribute the energy of the bass. (I removed the shelf from the graph below for demonstration purposes)
If I want to redistribute the energy away from the deep and rumbling sub area, I'll pull back at 30 Hz or 40 Hz with a shelf or bell. If I want more attack and transient energy from the low end instrument, I'll push up at 110 Hz to 140 Hz. If things feel too heavy or resonant, most likely 70 Hz to 110 Hz is taking up too much space. Pulling back the center frequency of 90 Hz will make the mix feel less congested and dense.
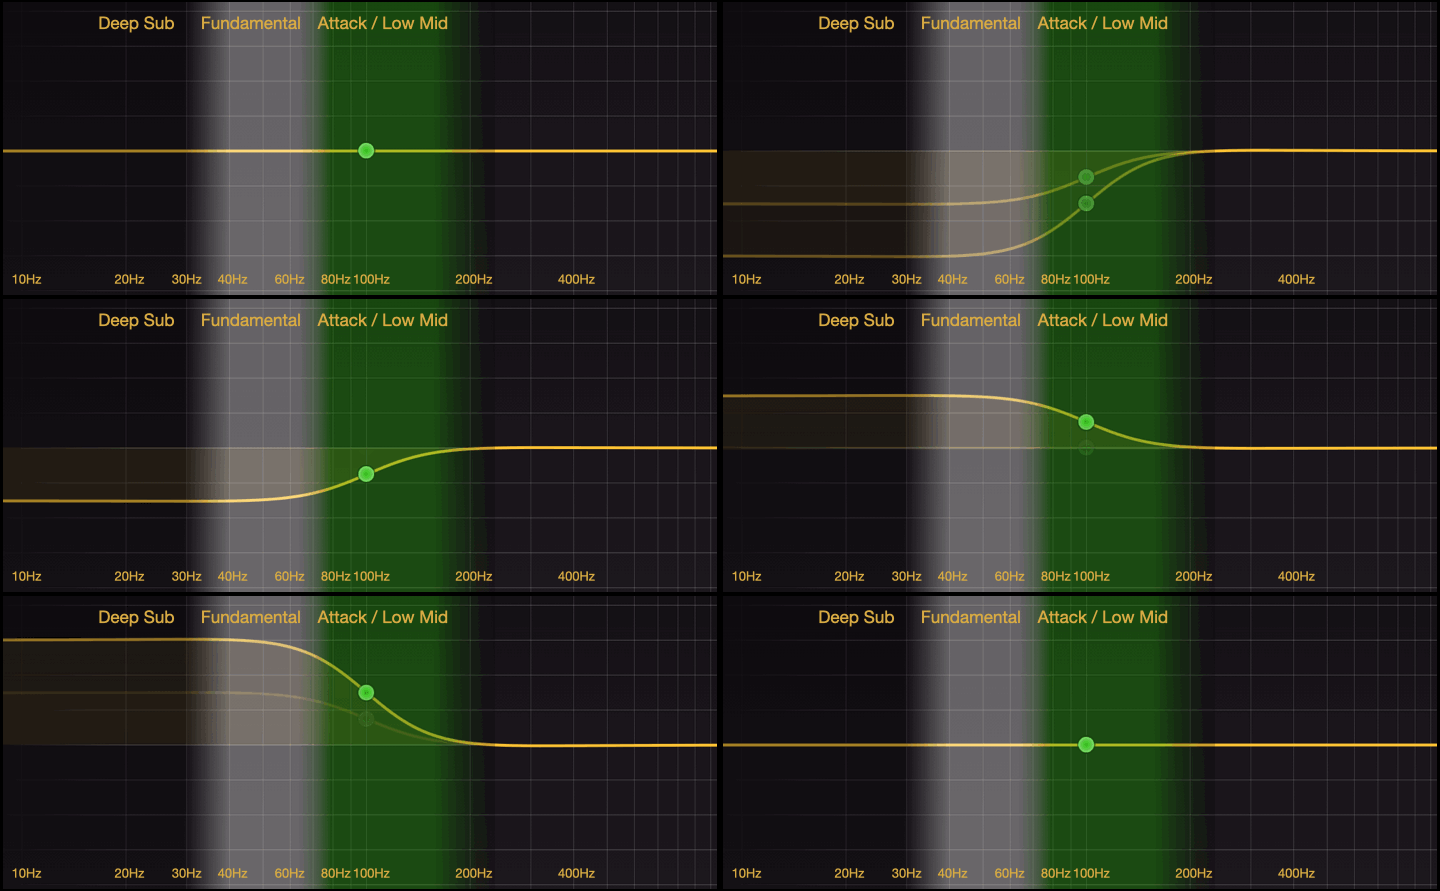
You can create all types of useful EQ shapes with a shelf and bell (or just two shelves). Here are some examples of how I may change the relationship between the first three octaves of a mix. Decibel values are excluded on purpose.
3) Set the Speed & Depth of the Low End
This last step is not always necessary. You have probably read all over the internet to "high-pass filter" everything, but I advise against that. I generally only high-pass filter if necessary. If there is excessive rumble or if the low end is feeling slow, I'll engage a high-pass filter, but I would most likely use another shelf first. I'll save my reasons for another day.
You may ask, "What do I mean by the low end sounding slow?" When there is excessive subs between 20 Hz and 40 Hz it can make a mix feel sluggish. Those frequencies tend to stick around and resonate for longer, making things feel slow. If the rhythm of the low end is particularly fast, then reducing the deep subs can give the low frequency rhythm more percussive clarity.
Set up a HPF with a 12dB per octave slope, close your eyes and drag the filter higher until you feel the low end getting lighter or faster. If you want the low end fast, you may want to aggressively high pass filter, but if you want pure and deep sub, it may be best to turn the HPF off and rely on another low frequency shelf to set the size of the sub. Here are some examples of the curves I may use to reshape the low end.
By setting the weight of the mix with a broad low frequency shelf, redistributing the energy of the first three octaves with bells, and setting the speed and depth of the low-end with a high pass filter, you can solve most low-frequency issues in a mix.
Occam's Razor - the simplest solution is almost always the best solution.
Give it a try and let me know what you think. Tag me on my @SchwabeDigital instagram and let me know what you think..
Be well,
Ryan Schwabe
Grammy-nominated and multi-platinum mixing & mastering engineer
Founder of Schwabe Digital


