EQing in Octaves: Part 1
This is the first of a three-part email series designed to simplify your approach to EQ and help you make better mixing decisions.
We measure sound frequencies on a logarithmic scale in Hertz (Hz), or cycles per second. While essential for describing audio, this unit can feel abstract and disconnected to how we think about and create music. For example, a frequency of 100 Hz means a sound wave vibrates or oscillates for one full cycle at 100 times per second.
Musical notes are sound waves oscillating at specific cycles per second, and an octave is simply doubling or halving those oscillations to move up or down the scale.
Here’s where it gets tricky: there are only 12 notes in an octave, regardless of whether you're looking at 30–60 Hz or 3,000–6,000 Hz. This is because octaves follow a logarithmic scale—frequencies double with each octave (e.g., 20 Hz, 40 Hz, 80 Hz, 160 Hz, and so on)
This doubling can seem daunting, especially on an EQ graph, but understanding it can simplify how you approach EQing and balancing a mix.
Simplifying EQ: From Hertz to Octaves
The human ear picks up frequencies from 20 Hz to 20,000 Hz—a pretty wide range. But sound doesn’t stop at the limits of our hearing range. There are sound waves below what we can hear (infrasonic) and above it (ultrasonic). However, these low frequencies are usually filtered out by DC filters, and high frequencies by anti-aliasing filters, depending on the sample rate, of course.
Focusing on what we can hear, if we think in terms of musical octaves instead of raw numbers, that big range of 20 Hz to 20,000 Hz boils down to just under 10 octaves. That’s 10 manageable “bands” to work with, instead of 20,000 individual frequencies. Much easier to wrap your head around, right? Those 10 octaves can be broken down like this...
The 'middle' frequency of our hearing range, numerically speaking, is around 640 Hz—an unexpected midpoint, but it makes sense when we think in terms of octaves. There are about 5 octaves below 640 Hz (down to 20 Hz) and 5 above (up to 20 kHz), meaning our hearing is split evenly in terms of octaves.
Relating EQ to musical octaves makes frequency adjustments feel more intuitive and grounded in how we naturally think about music. When EQing, I typically cut with narrower bands, often about an octave wide, to address specific issues. On the other hand, when boosting, I prefer using wider bells, spanning two or more octaves, to shape the tone more musically.
However, not all octaves are perceived equally. Our ears are most sensitive to the 1–5 kHz range (roughly octaves 6–8 on the frequency spectrum), where our hearing is naturally tuned to detect detail—an evolutionary trait that likely developed for survival. This range encompasses the majority of human speech, and our sensitivity to subtle nuances within it has been essential for communication and fostering social bonds throughout history.
That may be a bit too much evolutionary context for this conversation about EQing your mix, but this 2.5-octave range demands our attention. Our ears are particularly attuned to this area and are highly sensitive to imbalance, excessive transients, and shifts in loudness. Getting it right can dramatically affect how the listener perceives loudness, balance, and presence in your mix.
Thinking in octaves can transform your approach to EQ, shifting it from a technical grind to a more natural, gestural, and musical process. By mastering the fundamentals of EQ, compression, and saturation, you’ll discover that many “problem-solving” tools—like resonance suppressors (e.g., Soothe 2)—are often used to address balance issues that could be resolved with better EQ techniques. While these tools have their place in specific scenarios, they are frequently overused in modern music production.
By understanding how octaves relate to the music we create, you can map your EQ decisions more effectively to the issues you hear in a mix. This empowers you to make more informed choices and reduces reliance on complex modern resonance tools, which can inadvertently introduce unwanted artifacts that often go unnoticed.
In Part 2, we’ll dive deeper into the individual frequency bands. We’ll talk about common issues, how to tackle them, and how to keep your mixes musical and balanced.
Have questions? Just hit reply, and we’ll get back to you. You can also tag us on instagram—we’re always happy to connect!
Be well,
Ryan Schwabe
Grammy-nominated and multi-platinum mixing & mastering engineer
Founder of Schwabe Digital
Reviving Loud & Limited Pre-Masters with GOLD CLIP
As a mastering engineer, I’m often handed mixes that are already limited or clipped. These loud, finalized mixes can be tricky to work with because there’s often very little headroom or transient detail left. What I do as a mastering engineer involves envelope or dynamic shaping just as much as balancing, sweetening, and preparing a mix for distribution.
As a mastering engineer, I’m often handed mixes (pre-masters) that are already limited or clipped. These finalized mixes can be challenging to work with because they are already heavily limited, leaving little transient detail. As a mastering engineer, my work often includes envelope and dynamic shaping just as much as balancing, sweetening, and readying a song for distribution.
The Challenge of Loud Mixes
When I receive loud mixes, my ability to shape the envelope is reduced because the transients have been chopped away beforehand. While I usually request a separate, lower-level pre-master for more flexibility in handling transients, some mixing engineers prefer to stick with their loud mixes—and that’s perfectly fine.
The question is: what purpose does a clipper serve in a mix that’s already limited and clipped?
You might think a clipper has no role here. After all, if the transients are already clipped or limited, what more could a clipper possibly do? The answer lies in what makes Gold Clip so much more than just a clipper.
Gold Clip: Not Just a Clipper
Gold Clip isn’t just a traditional clipper—it’s a versatile tool equipped with internal processors specifically designed to refine limited or clipped signals, making it perfect for handling loud pre-masters. Every element in Gold Clip is bypass-able, allowing you to adapt it to the needs of your mix. For tracks that are already clipped or limited, you can turn off the clipping and saturation components while leaving on Box Tone and Alchemy. These processors can then work independently to smooth and soften clipping artifacts.
In my latest YouTube video, I explain how I use Box Tone and Alchemy to smooth and refine heavily limited or clipped mixes.
What You’ll Learn in the Video
🎛️ How Modern Box Tone smooths the top end, filters out harsh ultrasonic frequencies, and refines loud mixes.
⚙️ How Alchemy dynamically softens harsh peaks by emulating high-frequency compression, but without relying on traditional attack and release times. Instead, it behaves more like the natural smoothing effect of tape magnetization.
💡 Why Gold Clip’s bypass-able design makes it a versatile mastering tool, allowing you to use its processors as standalone tools for smoothing clipped or limited pre-masters.
If you’ve ever struggled with mastering loud, limited mixes, this video will give you some new ideas on how Gold Clip might help.
Check it out below:
Have questions? Just hit reply, and we’ll get back to you. You can also tag us on instagram—we’re always happy to connect!
Be well,
Ryan Schwabe
Grammy-nominated and multi-platinum mixing & mastering engineer
Founder of Schwabe Digital
05) Alchemy 2: Smooth, Tape-Inspired Sound
In medieval times, people believed in "alchemy": a fictional process that could supposedly transform mundane materials into precious gold. Sadly, it doesn't exist...
But in GOLD CLIP, it does :)
In medieval times, people believed in "alchemy": a fictional process that could supposedly transform mundane materials into precious gold. Sadly, it doesn't exist...
But in GOLD CLIP, it does :)
🔹 ALCHEMY 2 🔹: Smoother, Richer, More Musical
Alchemy 2 is a peak processor that softens mid-to-high frequencies, reducing harshness and unwanted clipping artifacts. It brings a smooth, tape-like quality to your mix, creating a cohesive and polished sound, especially as signals approach the clip point.
As audio gets louder, Alchemy 2 gently shapes peaks and tames aggressive frequencies without dulling the mix. It’s perfect for maintaining clarity and adding warmth while preserving the natural energy of your tracks.
The below plot shows the EQ curve of Alchemy 2:
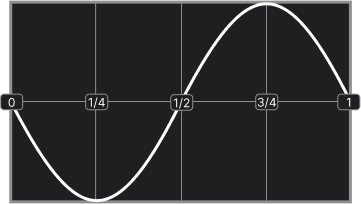
When Alchemy is set to 2 dB, the EQ curve above reacts to the clipped signal with the transfer function below.
When To Use ALCHEMY
Much like tape, Alchemy applies high-frequency compression instantaneously, without attack or release artifacts. This makes it ideal for taming harshness in a natural and transparent way.
Alchemy can be used as a subtle de-esser or high-frequency softener. I usually start with Alchemy at 0 dB, then set the amount of clipping I need. From there, I turn up Alchemy to pull back harsh mid-range and high frequencies, creating a smoother, more polished sound.
If you’re using a limiter to add gain after Gold Clip, Alchemy can also enhance perceived loudness. It increases the impact of kick drums and other low-frequency transients as they ascend into the clipper, giving your mix more weight and punch.
Things to Keep In Mind
Alchemy processing is tied to the signal’s proximity to the clip point, similar to Gold processing. In most popular music, the loudest signal is typically the kick drum and/or bass, often around 80 Hz.
As the low-end frequencies from the kick or bass approach the clip point, Alchemy begins reducing the mid and high frequencies. This dynamic adjustment helps maintain balance and smoothness in the mix.
For example, if a clap and a kick hit simultaneously, the clap might appear slightly quieter than the kick. That’s because Alchemy is pulling down the mid-range and highs as the combined signal nears 0.0 dBFS, ensuring a cleaner and more cohesive result.
Check Out this video on the New Alchemy 2!
Give Alchemy 2 a try next time you use Gold Clip, and let me know what you think. Tag @SchwabeDigital in an instagram story and show us how you are using it. We'll repost.
In the next post, we'll talk about the three clipping algorithms.
Be well,
Ryan Schwabe
Grammy-nominated and multi-platinum mixing & mastering engineer
Founder of Schwabe Digital
p.s. Subscribe below for updates on Schwabe Digital Plugins.


